What You'll Build
Welcome to the Product Builders Club Live Building walk-through. This guide walks you through the entire process of building a retro-styled beat pad web app — from initial design inspiration all the way to a live, deployed product on the internet. You'll use an AI-driven, design-first workflow that connects a design canvas directly to your codebase.
What you'll build: A playable beat pad where users can upload their own sounds to pads, trigger them by clicking or pressing keyboard keys, and have their sounds persist across page refreshes.
Estimated time: ~60 minutes
Tools You'll Need
| Category | Tool | Purpose |
|---|---|---|
| Terminal | Warp | Terminal app with easy tab management, beginner-friendly |
| Agent | Claude Code | AI coding agent that runs in your terminal |
| Design Canvas | Paper | Design tool that renders HTML/CSS on canvas — direct 1:1 relationship with code |
| Code Framework | Next.js | React-based JavaScript framework |
| Component Library | shadcn/ui | UI component system that provides a strong design system foundation |
| Code Hosting | GitHub | Version control and code repository |
| Deployment | Vercel | Hosting platform with auto-deploy from GitHub |
Starting with shadcn/ui gives you a solid design system foundation in the code that you can layer on top of. Paper renders HTML and CSS natively, so designs translate closely to actual code — reducing the gap between what you design and what gets built. Claude Code ties everything together, reading from Paper and writing to your codebase.
Prerequisites
Before you begin, make sure you have the following set up:
Accounts
- GitHub account
- Vercel account (can sign in with GitHub)
- Access to Claude Code
Software
- Node.js (v18+) and pnpm installed
- Warp terminal (or any terminal you prefer)
- Paper desktop app installed and open
- Code editor (VS Code, Cursor, etc.)
Paper MCP Setup
You must install the Paper MCP before opening Claude Code. This is what allows Claude Code to read from and write to your Paper design files.
- Go to paper.design/docs/mcp
- Run the terminal command provided in the docs before you open Claude Code
- Make sure the Paper desktop app is open and running — the MCP runs locally and needs the desktop app to function
It runs locally on your computer, connected to the Paper desktop app. Claude Code communicates with Paper through this local connection to read designs, create artboards, and write HTML/CSS to the canvas.
How the Workflow Works
The core of this workflow is Claude Code acting as the bridge between your design canvas and your code repository:

- Claude Code reads from Paper — examines your designs, colors, layout, typography
- Claude Code writes to Paper — creates new artboards, design variations, components
- Claude Code reads from Paper again — takes the finalized design as a reference
- Claude Code writes to your codebase — implements the design as working code
- You can edit Paper directly at any time — move things, change colors, adjust spacing, just like any design tool
You're not locked into only directing the design through text prompts. Once something is on the Paper canvas, you can manually adjust anything — spacing, colors, properties — just like you would in Figma or any other design tool. This is the best of both worlds.
Step 1: Create a New Code Project
We start by scaffolding a Next.js project with shadcn/ui already configured.
1.1 — Get the shadcn init command
- Go to ui.shadcn.com
- Click New Project
- Select Next.js as the framework
- Select Base UI as the component foundation (more actively maintained)
- Copy the terminal command it generates
The command will look something like this:
pnpm dlx shadcn@latest init --preset b0 --base base --template next
1.2 — Run it in your terminal
- Open Warp (or your terminal)
- Navigate to the folder where you want to create the project
- Paste and run the command
pnpm dlx shadcn@latest init --preset b0 --base base --template next
- When asked for a project name, enter:
my-beat-pad - Wait for it to create the project, install dependencies, and set up the files
1.3 — Move into the project
cd my-beat-pad
You now have a basic Next.js project with shadcn/ui installed. If you run pnpm dev and open http://localhost:3000, you'll see a blank page that says "project ready" with a button. That's our starting point.
Step 2: Connect to GitHub and Vercel
This ensures that every time you push code changes, they automatically deploy to the internet.
2.1 — Create a GitHub repository
- Go to github.com/new
- Name the repo
my-beat-pad - Leave it as Public (or Private if you prefer)
- Do not initialize with a README (we already have files)
- Click Create repository
2.2 — Link your local project to GitHub
GitHub will show you commands to push an existing repository. Run these in your terminal:
git remote add origin https://github.com/YOUR-USERNAME/my-beat-pad.git
git push -u origin main
2.3 — Connect to Vercel
- Go to vercel.com and sign in
- Click New Project
- Import the
my-beat-padrepository from GitHub - Click Deploy
Vercel will build and deploy what you have (just the blank starter). From now on, every time you merge code into the main branch, Vercel automatically deploys the updated app.
Setting up the deployment pipeline first means you don't have to think about it later. When you're ready to ship, it's just a merge away.
Step 3: Start Claude Code
3.1 — Open Claude Code in your terminal
In the terminal, make sure you're in the my-beat-pad directory, then:
claude
Accept the trust prompt when asked.
3.2 — Open your code editor
Open the my-beat-pad folder in your code editor (VS Code, Cursor, etc.) so you can see the code as it changes.
3.3 — Verify Paper MCP is connected
When you make your first prompt referencing "Paper," you should see Claude Code connect to the Paper MCP. A small indicator in Paper will show that it's connected.
Step 4: Design in Paper
This is where the magic starts. We're going to have Claude Code create designs in Paper based on a mood board / design inspiration — then iterate until we're happy with the direction.
4.1 — Set up your design inspiration
Before prompting Claude Code, prepare your design canvas in Paper:
- Open the Paper desktop app
- Create a new file (or open an existing one)
- Add a Design Inspo artboard with imagery that captures the vibe you're going for
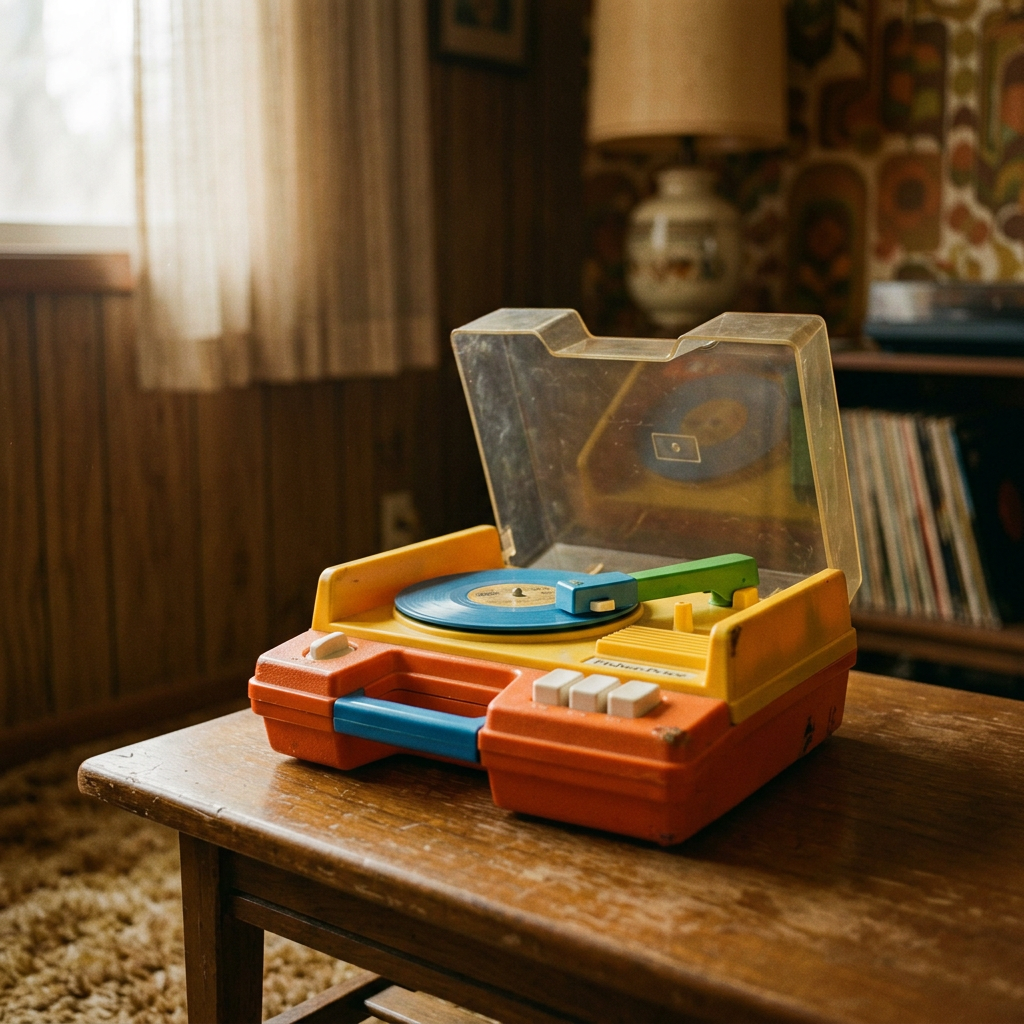
For this project, we used an image of a 1970s Fisher-Price record player (vintage, warm tones) to set the overall warm, brownish, nostalgic aesthetic:
Your design inspiration doesn't need to be elaborate. Even a single image with a few words about the mood is enough for Claude Code to extrapolate a design direction. Think of it as a mood board.
4.2 — Prompt Claude Code for design variations
In Claude Code, enter:
I want to design a beat pad app that is two pads across and four pads down
based on the design inspo artboard. Create three variations of this app in Paper.
Important: Always reference "Paper" in your prompt — both when telling Claude where to look for context and where to create the design. This triggers the Paper MCP connection.
What happens next:
- Claude Code reads the Paper file and describes what it sees (the mood board image, colors, fonts)
- It creates three artboards with different design variations
- It writes HTML and CSS directly to the Paper canvas
- It takes screenshots to self-review and may fix spacing/contrast issues
The three variations might be something like:
- V1 — Retro Toy: Vibrant, playful pads in orange, yellow, blue, and green. Cream background with chunky rounded corners.
- V2 — Vinyl Lounge: Dark, moody design with warm brown/amber/mahogany tones and subtle border details.
- V3 — Analog Warmth: Soft, modern pastels — warm tans, sage greens, and dusty blues with extra-rounded corners.
4.3 — Choose a direction and refine
Pick the variation you like best. You can:
- Delete the variations you don't want
- Manually adjust anything in Paper (spacing, colors, fonts, sizes)
- Prompt Claude Code for further refinement
Example refinement prompt:
I like V1 Retro Toy the best. Can you make some of the pads as if they
had sounds already loaded onto them and some pads that don't have sounds
loaded? Each pad should have an upload action. Can you design an additional
version in Paper based on this V1 direction?
4.4 — Iterate on the design
Continue refining. Common adjustments:
- "Can you make all of the pads the same size, even if it has a sound loaded or not? Make this change in Paper."
- Delete elements you don't need (e.g., a BPM indicator or play button if they're not part of your MVP)
- Adjust spacing, padding, and borders directly in the Paper UI
If you manually delete or change something in Paper, Claude Code might not "know" about it if it's still using its conversation memory. A good practice: once you're done iterating on the design, clear Claude Code's context (type /clear). That way, when it starts the coding phase, it only looks at what's actually in the design file — not what it remembers from the conversation.
Don't try to make the design perfect at this stage. Get to a direction you're happy with, then move to code. You can always come back and iterate. The design-first approach is about establishing direction, not pixel-perfection.
Step 5: Plan and Code Based on Designs
Now we switch from designing to building. Claude Code will read the design from Paper and implement it in your Next.js codebase.
5.1 — Clear context and create a feature branch
/clear
Then:
Create a new branch called 'feat/beat-pad'
This creates a separate Git branch so all your changes are isolated. You'll merge back to main when everything works.
5.2 — Initialize Claude Code in the project
/init
This has Claude Code scan your project structure, read configuration files, and create a CLAUDE.md file with context about the project (dev commands, architecture, conventions).
5.3 — Connect Vercel (if you forgot earlier)
If you haven't connected to Vercel yet, do it now while Claude Code initializes. Go to Vercel, import the GitHub repo, and deploy.
5.4 — Enter plan mode and describe the feature
Press Shift+Tab to enter plan mode, then describe what you want to build:
Take a look at the V1 Retro Toy (Pad States) artboard in Paper and plan
the implementation of it in code.

A user can upload their own sounds into the beat pad by pressing on a pad.
It will trigger that sound to play one time. The user will first upload a
sound, then that sound will show the state with the name of the file. The
user can press that button and it will play/trigger that sound. Pressing
the trigger again will re-trigger the sound and stop the original played sound.

Please interview me about this implementation — ask me questions about
trade-offs before you plan it out.
This is a powerful technique. Instead of trying to write a complete requirements document upfront, you let Claude ask you the questions that matter for implementation. Requirements emerge naturally through this back-and-forth, and it surfaces edge cases you might not have thought of.
5.5 — Answer Claude's questions
Claude Code will examine the design and codebase, then ask you questions. Here are the types of questions it may ask and how we answered them:
| Question | Our Answer |
|---|---|
| Should the grid always be 8 pads, or should users add more rows? | Fixed 8 pads (4 rows x 2 columns) |
| Should the waveform be real or decorative? | Decorative only |
| Should uploaded sounds persist when the user refreshes? | Yes — use IndexedDB for persistence |
| Should users be able to remove/replace a sound? | Not for V1 — no removal for now |
| How should colors be assigned to pads? | Rotate through a palette (each pad gets a unique color) |
| Mobile-first or full-width? | Mobile-first, centered, single-column on mobile |
| What fonts? | Use the design fonts from Paper (serif) |
| What audio formats? | WAV and MP3 only |
5.6 — Review and tweak the plan
Claude Code generates a plan file. Review it and make adjustments:
Can you make this at the /beat-pad route instead?

Also, ensure you are using color tokens in CSS — don't hard-code color values.
Using CSS custom properties (tokens) for colors instead of hard-coding hex values means you have a design system in your code. This makes it easy to change the entire palette later and keeps things consistent.
5.7 — Let Claude Code build
Once the plan looks good, let Claude Code execute. It will:
- Create component files (pad grid, filled pad, empty pad, waveform bars)
- Set up the audio engine (hooks for uploading and playing sounds)
- Configure IndexedDB for sound persistence
- Wire up the page assembly and routing
- Update global styles with the retro theme colors
You can watch the code appear in your editor in real time.
Step 6: Test, Debug, and Iterate
6.1 — Test the app
While Claude is building, you can check progress at http://localhost:3000/beat-pad (make sure your dev server is running with pnpm dev).
6.2 — Debug issues
It's normal to hit bugs on the first run. In our session, we hit an IndexedDB error when uploading sounds. The fix workflow is simple:
- Copy the error message from the browser
- Paste it into Claude Code: "I'm getting an error when I upload a new sound. The error is: [paste error]"
- Claude Code fixes the issue
6.3 — Commit your working version
Once the core functionality works, commit immediately:
Can you commit and push these changes?
Commit as soon as you have a working version, even if it's not perfect. This gives you a safe checkpoint to return to.
6.4 — Add features iteratively
With the core working, add features one at a time. For example, we added keyboard mapping:
Can you map the different pads to keys on my keyboard? On the left column
from top to bottom should go from 5 to B. On the right column should go
from 6 to N. When I press a key, it should trigger the sound in that pad.
This lets you play multiple pads simultaneously using the keyboard — something you can't do with a mouse alone.
Get the core part working first, then see what you actually need. In our case, we didn't realize we needed a "stop all sounds" button until we actually started playing the beat pad. Requirements emerge from using the product.
Step 7: Merge and Deploy
7.1 — Create a Pull Request
Make a PR for this
Claude Code will:
- Push your branch to GitHub
- Create a pull request with a summary of changes
- Include a test plan
7.2 — Merge the PR
- Open the PR on GitHub (Claude Code provides the URL)
- Review the changes if you'd like
- Click Merge pull request
7.3 — Verify deployment
Vercel automatically builds and deploys when you merge to main.
- Go to your Vercel dashboard
- Wait for the build to complete
- Visit your app at
https://my-beat-pad.vercel.app/beat-pad
Your beat pad is now live on the internet!
Next Steps: Continuing to Iterate
The first version is deployed, but there's always more to build. Here's how to continue the design-to-code loop:
Add a Landing Page
- In Claude Code, prompt: "Can you design a super simple landing page in Paper that says 'Welcome to my beat pad' with a call to action button that goes to the /beat-pad route? Base the design on the style already in the artboards."
- Create a new branch:
feat/landing-page - Have Claude Code implement the landing page in code
- Merge and deploy
Add a Context Menu
- In Claude Code, prompt: "Can you design a context menu for the pads that would be triggered by right clicking or long pressing on a pad? It should have: Replace sound, Clear sound. Design this in Paper."
- Review and refine the design in Paper
- Implement in code on a new branch
- Merge and deploy
Load an Existing Codebase into Paper
If you have an existing project and want to bring it into Paper:
- Connect Claude Code to both the code repository and Paper
- Prompt: "Look at this code repository and build out the main screens/pages in Paper"
- Ask it to create a design system in Paper based on the code (typography, colors, spacing tokens, components)
- Use the design system in Paper to drive new design variations
Tips and Best Practices
Design Phase
- Start with a mood board — even a single image with a few words sets the tone
- Generate multiple variations — ask for 3 variations and pick the best direction
- Combine ideas — take elements from different variations
- Edit directly in Paper — don't fight the agent with text for small tweaks; just do it in the design tool
- Clear context between phases — when moving from design to code, clear Claude Code's context so it only reads the final design file
Planning Phase
- Use plan mode (Shift+Tab) — have Claude Code plan before building
- Ask Claude to interview you — let it surface the questions that matter for implementation
- Don't write a requirements doc — requirements emerge naturally through building
- Use color tokens — ensure Claude uses CSS custom properties, not hard-coded color values
Building Phase
- Commit early and often — save working versions as checkpoints
- Fix bugs by pasting errors — copy/paste error messages directly into Claude Code
- Add features one at a time — get each feature working before moving on
- Test in the browser constantly — don't wait until everything is "done" to check
Workflow
- Measure twice, cut once — the planning phase takes the longest, and that's a good thing
- Get something real fast — a working prototype in minutes beats a requirements document that takes days
- Use the product — new requirements emerge from actually using what you built
- Create branches for each feature — keeps your main branch clean and deployable
Quick Reference: Key Commands
| Action | Command |
|---|---|
| Start Claude Code | claude |
| Clear context | /clear |
| Enter plan mode | Shift+Tab |
| Initialize project context | /init |
| Run dev server | pnpm dev |
| Create new branch | Prompt: "Create a new branch called 'feat/feature-name'" |
| Commit and push | Prompt: "Can you commit and push these changes?" |
| Create PR | Prompt: "Make a PR for this" |
Appendix: Prompts Used in This Walk-Through
Design prompts
- "I want to design a beat pad app that is two pads across and four pads down based on the design inspo artboard. Create three variations of this app in Paper."
- "I like V1 Retro Toy the best. Can you make some of the pads as if they had sounds already loaded onto them and some pads that don't have sounds loaded? Each pad should have an upload action. Can you design an additional version in Paper based on this V1 direction?"
- "Can you make all of the pads the same size, even if it has a sound loaded or not? Make this change in Paper."
Planning prompts
- "Take a look at the V1 Retro Toy (Pad States) artboard in Paper and plan the implementation of it in code. [feature description]. Please interview me about this implementation."
- "Can you make this at the /beat-pad route instead? Ensure you are using color tokens in CSS."
Building prompts
- "I'm getting an error when I upload a new sound. [paste error]"
- "Can you commit and push these changes?"
- "Can you map the different pads to keys on my keyboard? On the left from top to bottom should go from 5 to B. On the right should go from 6 to N."
- "Make a PR for this."
Post-build prompts
- "Can you design a super simple landing page in Paper that says 'Welcome to my beat pad' with a call to action button that goes to the beat pad route? Base the design on the style already in the artboards."
- "Can you design a context menu for the pads triggered by right clicking or long pressing? It should have: Replace sound, Clear sound. Design this in Paper."